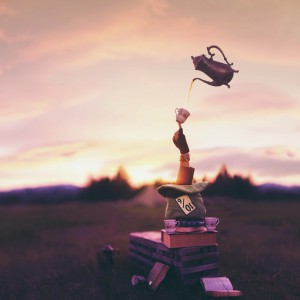
It’s been a while since I’ve done a tutorial so I thought I would write a short one with some behind the scenes for my recent photo titled “Just One More Cup”.
The idea for this image all starts from a group that I belong to on Facebook and Flickr called “Let’s Get Creative“. It’s a group of amazingly talented photographers from all over the world that are challenging themselves to stay creative all year by taking photos each week based around a certain theme. I started a bit late, but I’m working on catching up and the theme that I worked on this week was “Hats”. Immediately the first thing that I thought of was The Mad Hatter from Alice in Wonderland and with that I let my mind wander.
I have a few sketches in my book that are close to what this image turned out to be and originally in my mind it was going to look differently but I changed my mind as I was shooting and I liked the result more than the original idea!
The location of this image is one that I frequent a lot, for a lot of reasons. For one, it’s about a 2.5 minute walk from my house which is handy for waiting until the last minute like I did shooting this! It has really nice tall grass, the sun sets behind some trees creating beautiful golden bokeh and sometimes there are deer munching away in the background.
The downside to this location is that it’s a strip of “wild grass” located between a popular disc golf course and a running track at our local college which means there’s usually a few people around. As I was shooting this photo, there were about 10 people running around the track including an entire family who slowed down to watch every time they went around one more lap. I get in the zone and forget for the most part that people are probably wondering what the weird guy in the grass is doing, just intent on getting the shot!
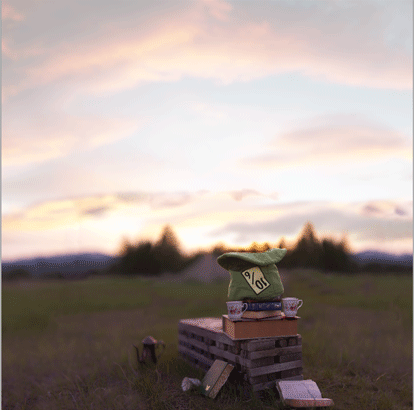
The idea behind this photo is that the hatter is enjoying one more cup of tea before the sunsets and he disappears back into his “mad world” which exists inside his hat.
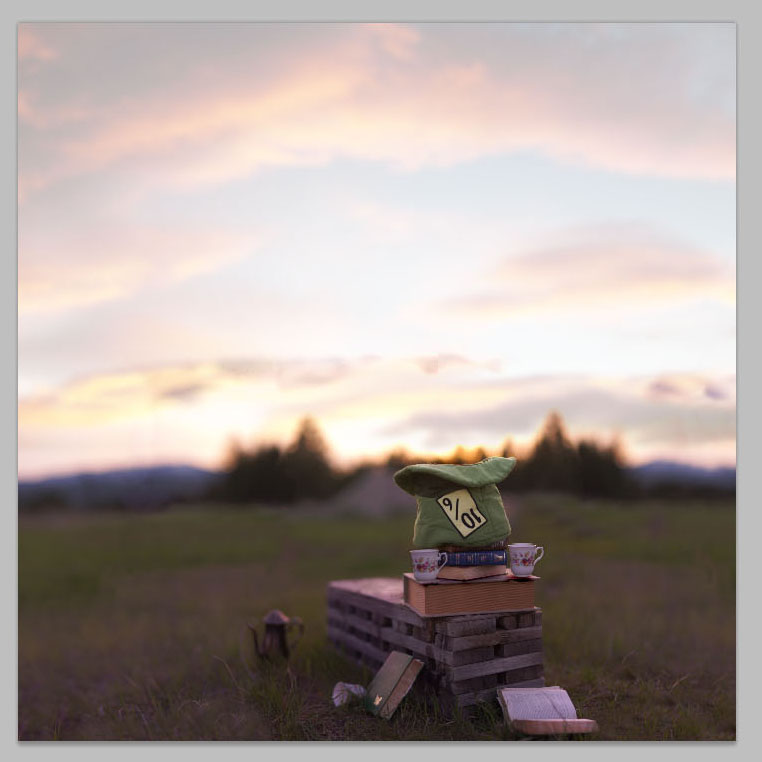
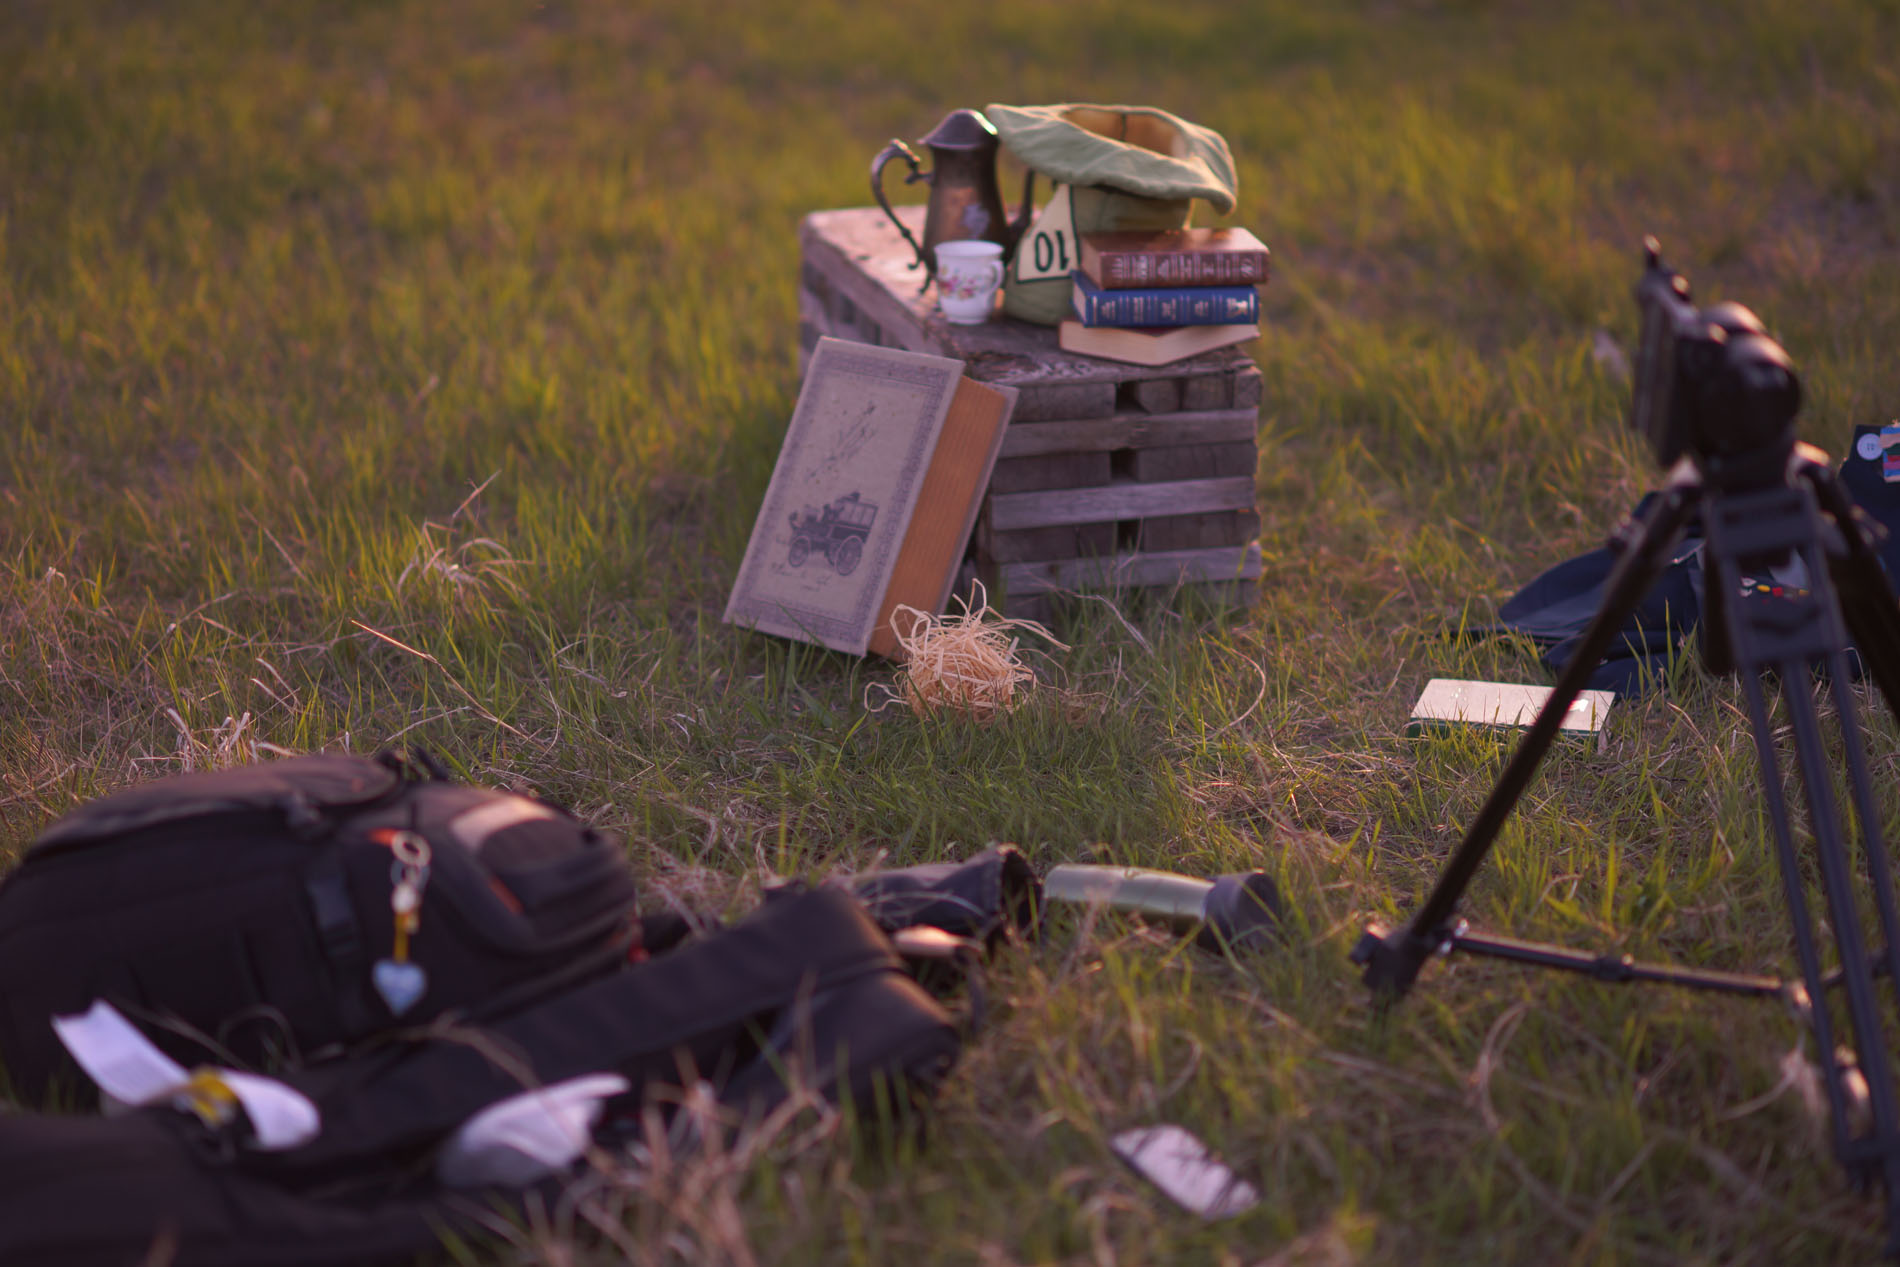
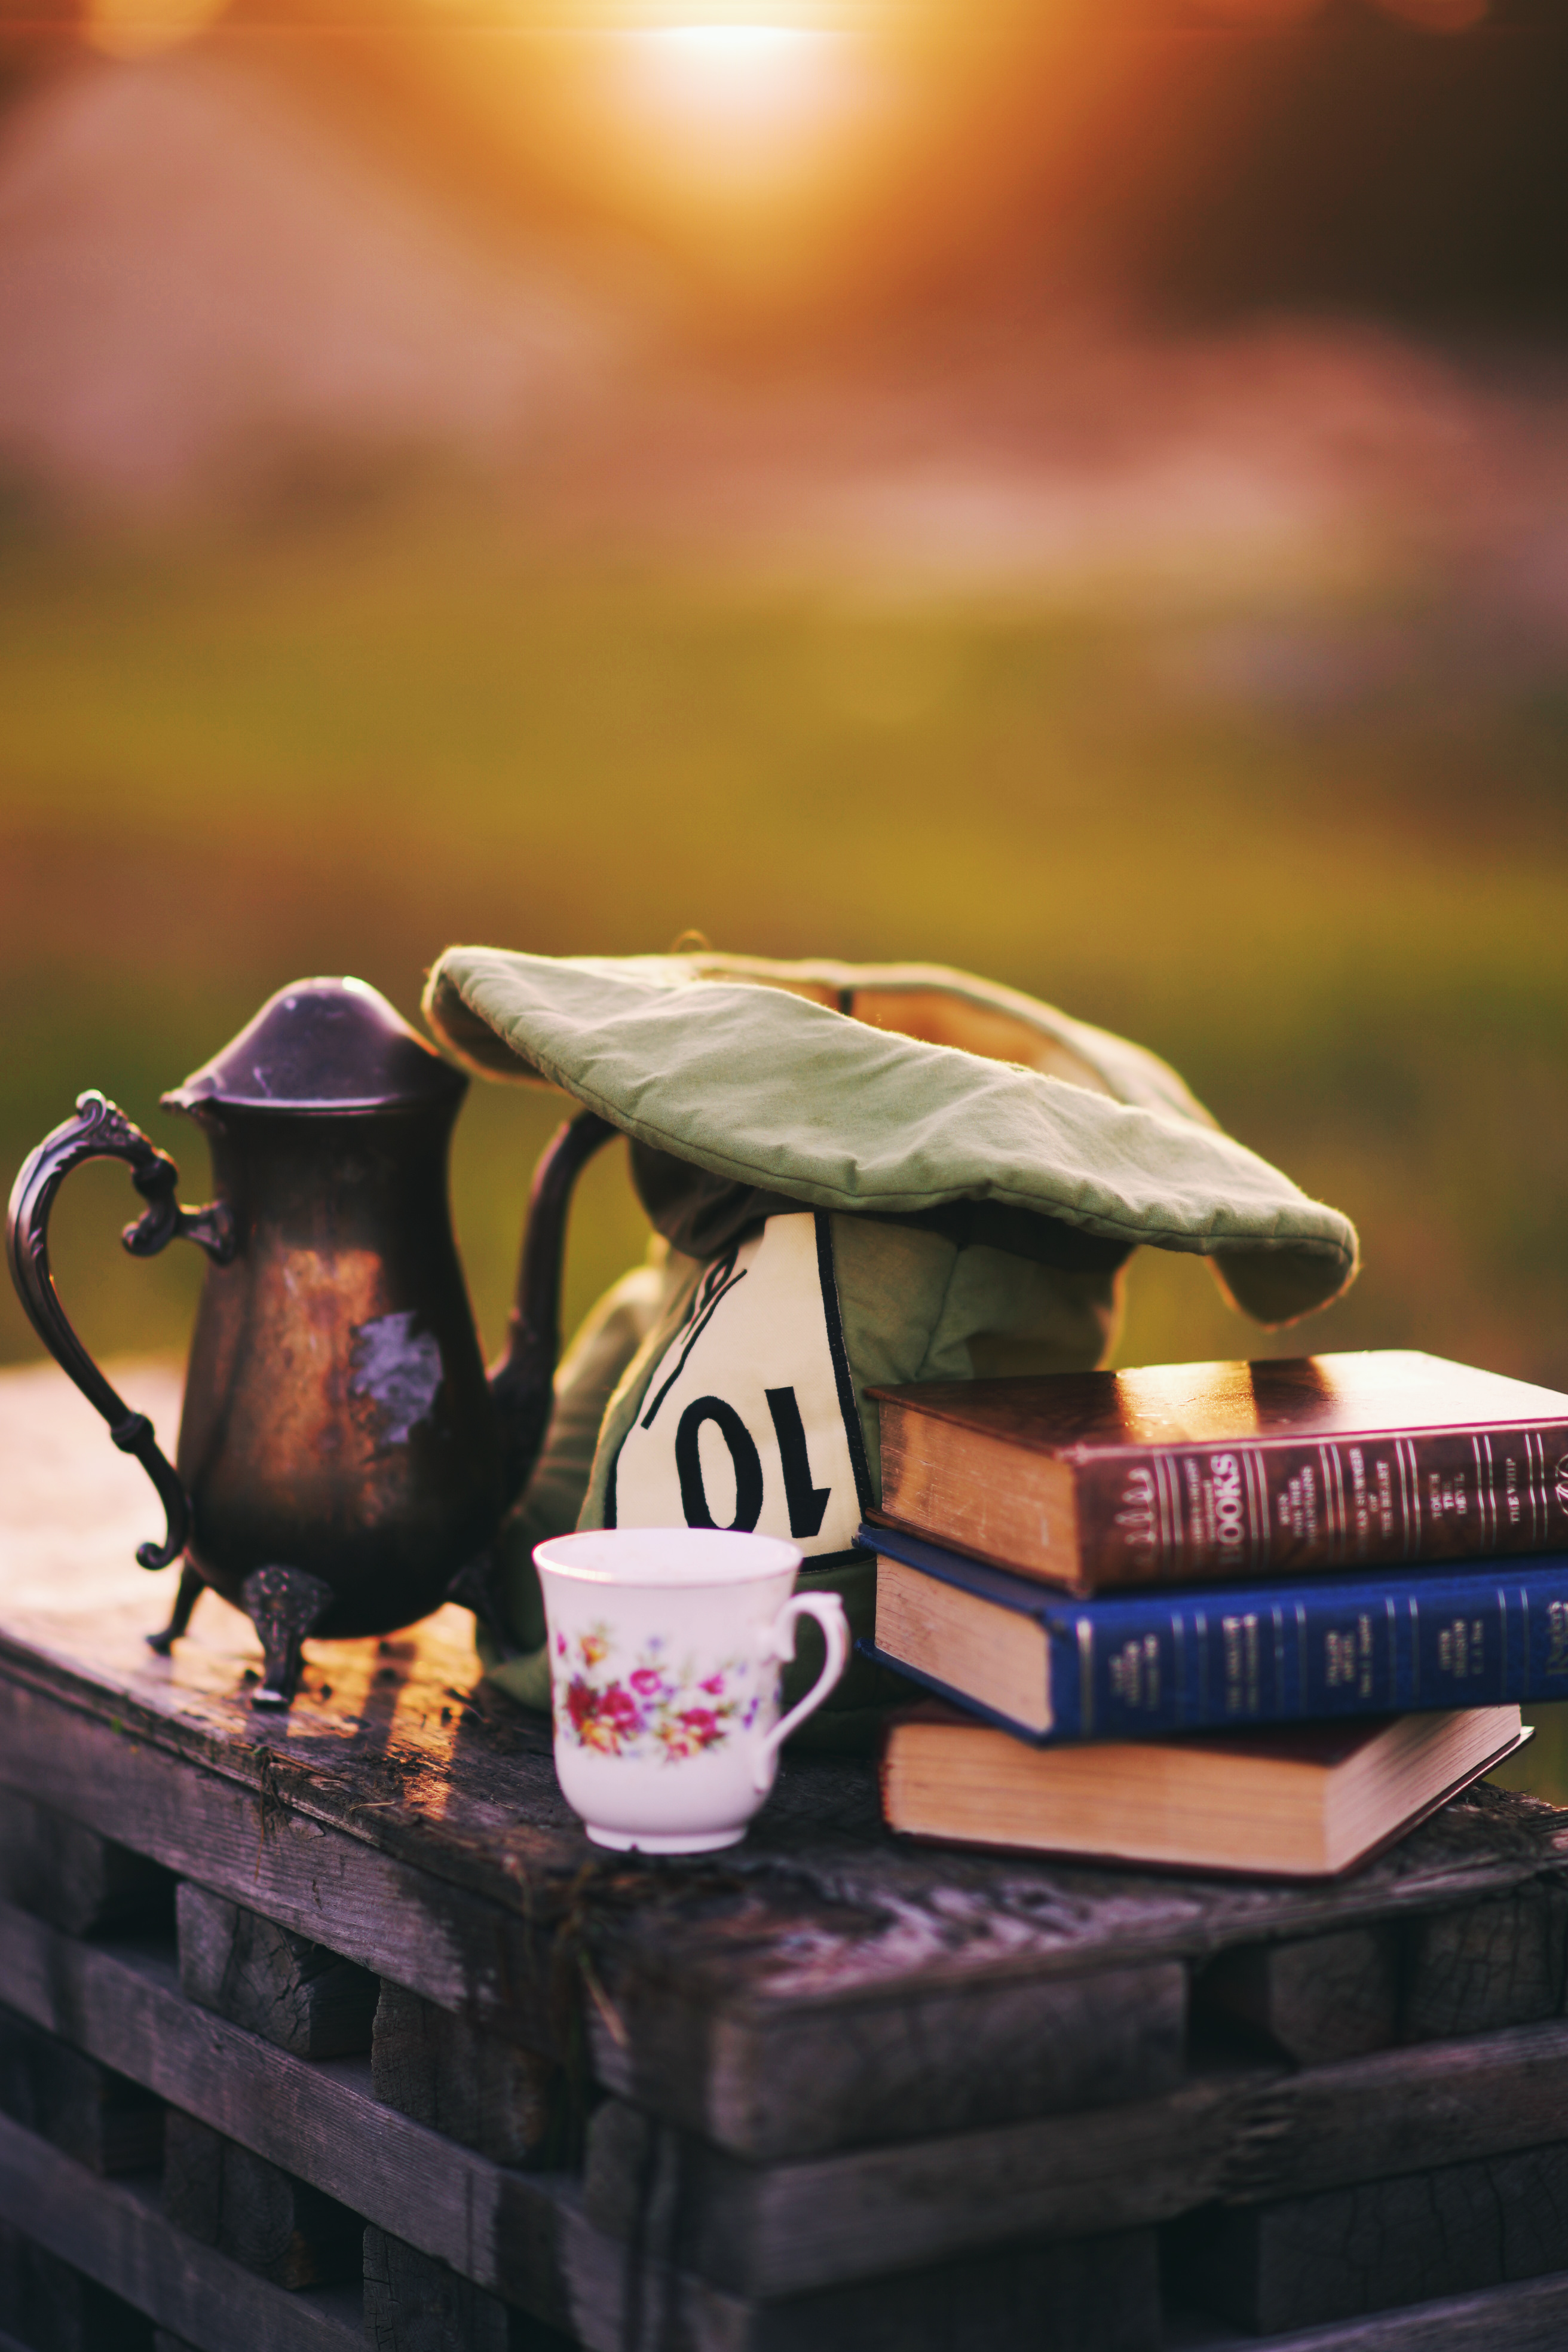
The first few shots I took were of the “scene” or the hat/books/teacups resting on the wooden bench thing in the grass. I used my 85mm lens at ISO 50, 1/400, and 1.4. The sun was still bright enough that I didn’t need to bump up the ISO and since the colours in the sky were so vibrant I wanted to keep it fairly dark to catch the tones. The main image ended up being an expanded shot of about 25 images, combined to create one canvas. You can read a tutorial on expansion here if you’re not sure what that is or why I do it.
https://www.joelrobison.com/index.php/an-expansion-tutorial/
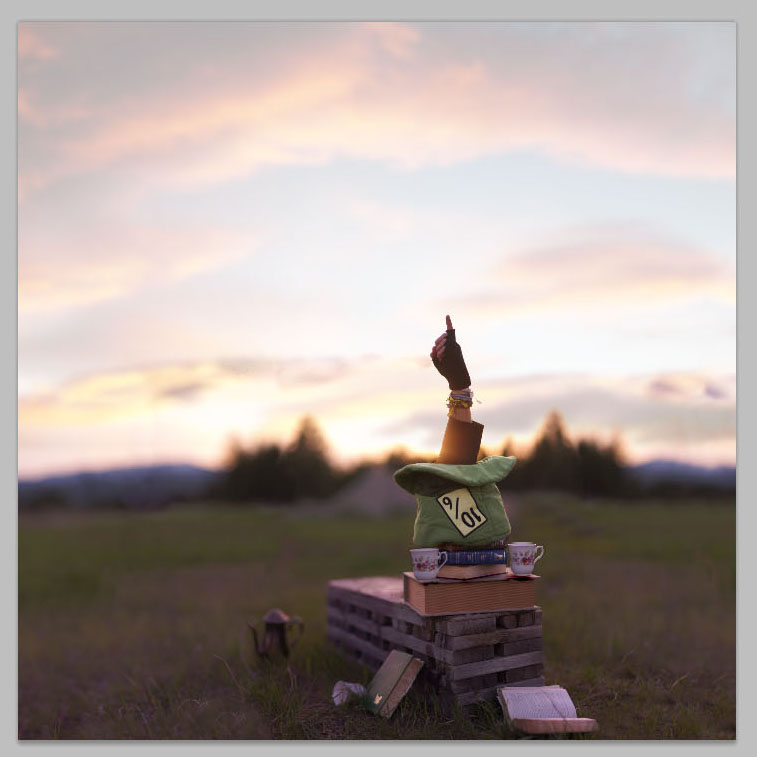
After I had the setup shot, it was time to get my arm extending out of the hat. I tried this a few different ways. First I tried to stick just my elbow into the hat and reach it out like this:
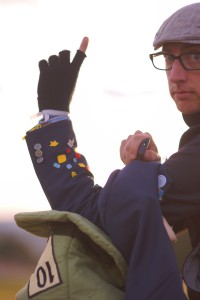
But that didn’t work, my forearm was in the way and folding the hat. Then I tried sticking my hand up behind the hat like this:
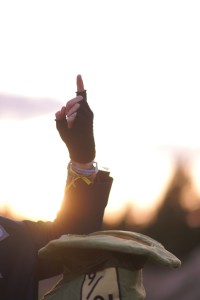
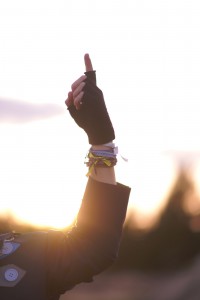
But I didn’t want to lose the focus that I had set on the hat and all the shots ended up blurry. So I eventually decided to just move the hat and put my hand where it was. It worked pretty nicely and I got the shot I needed:
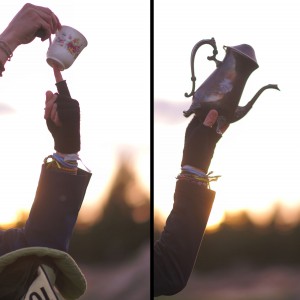
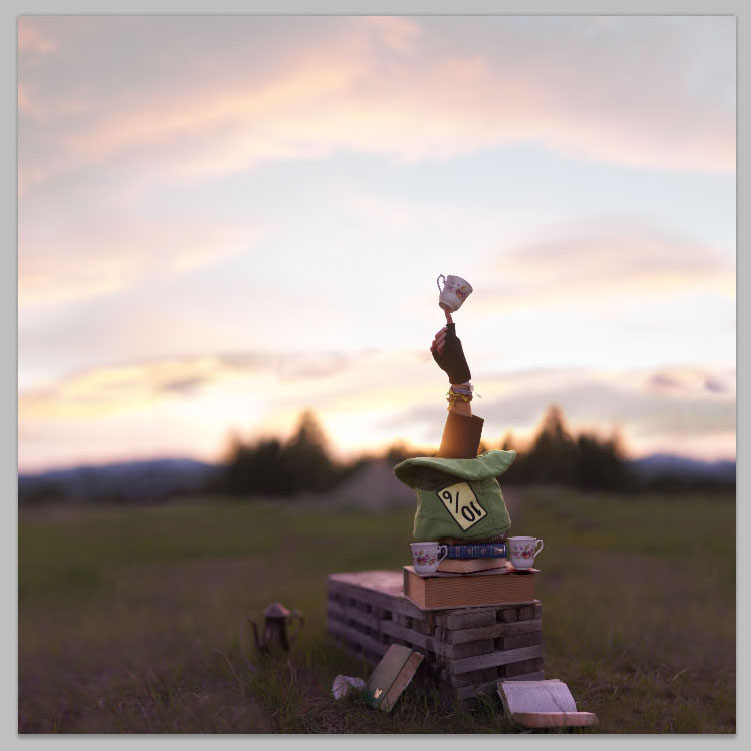
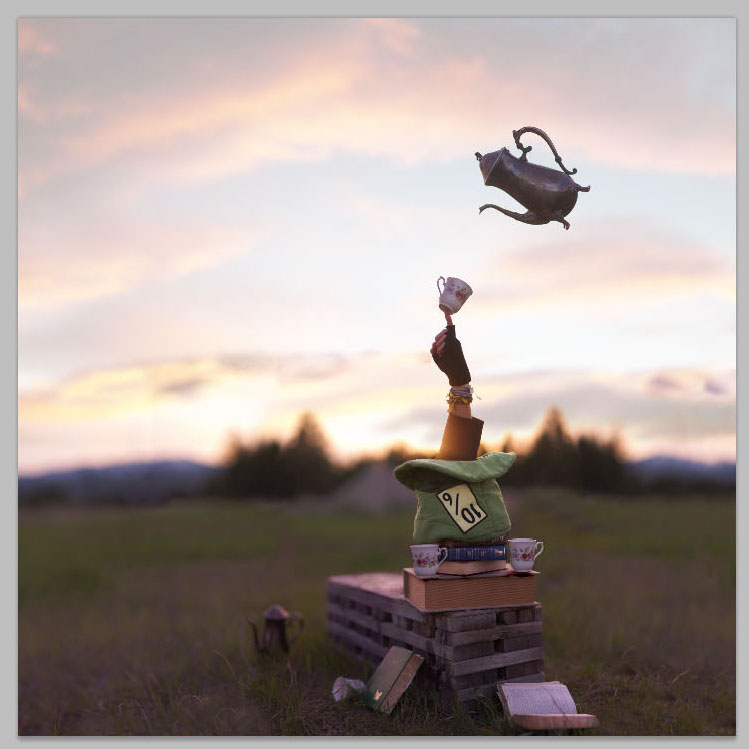
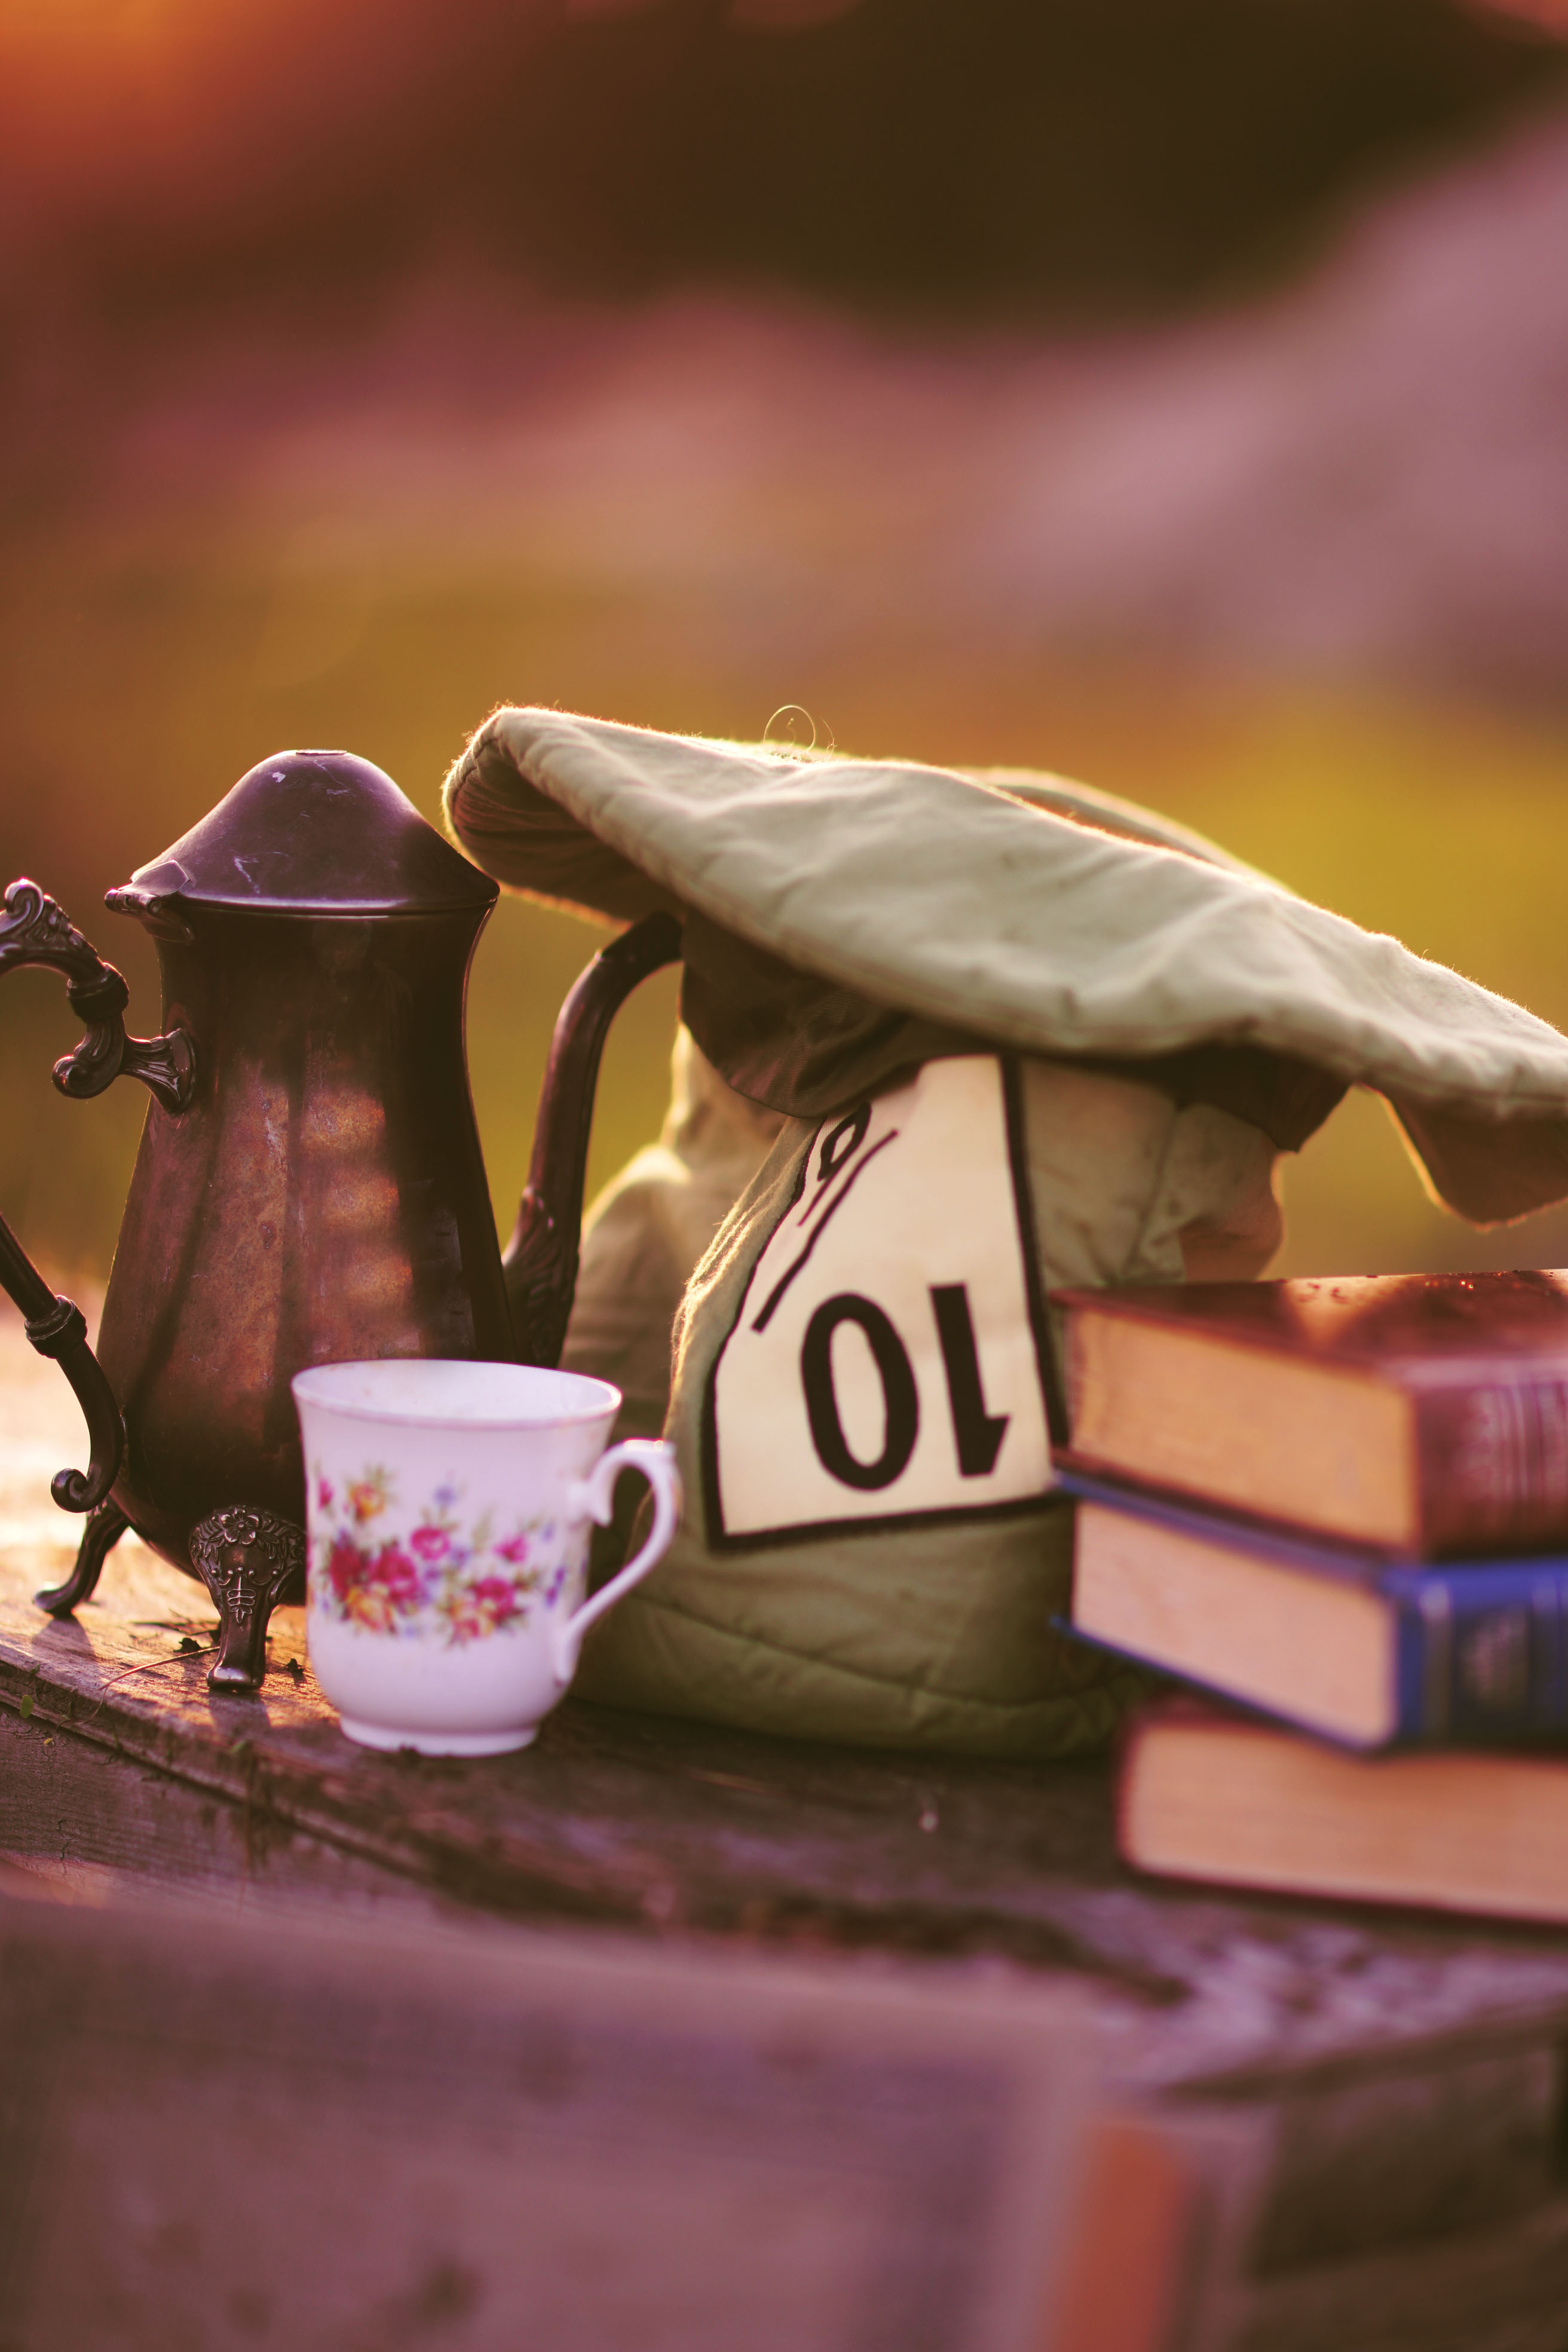
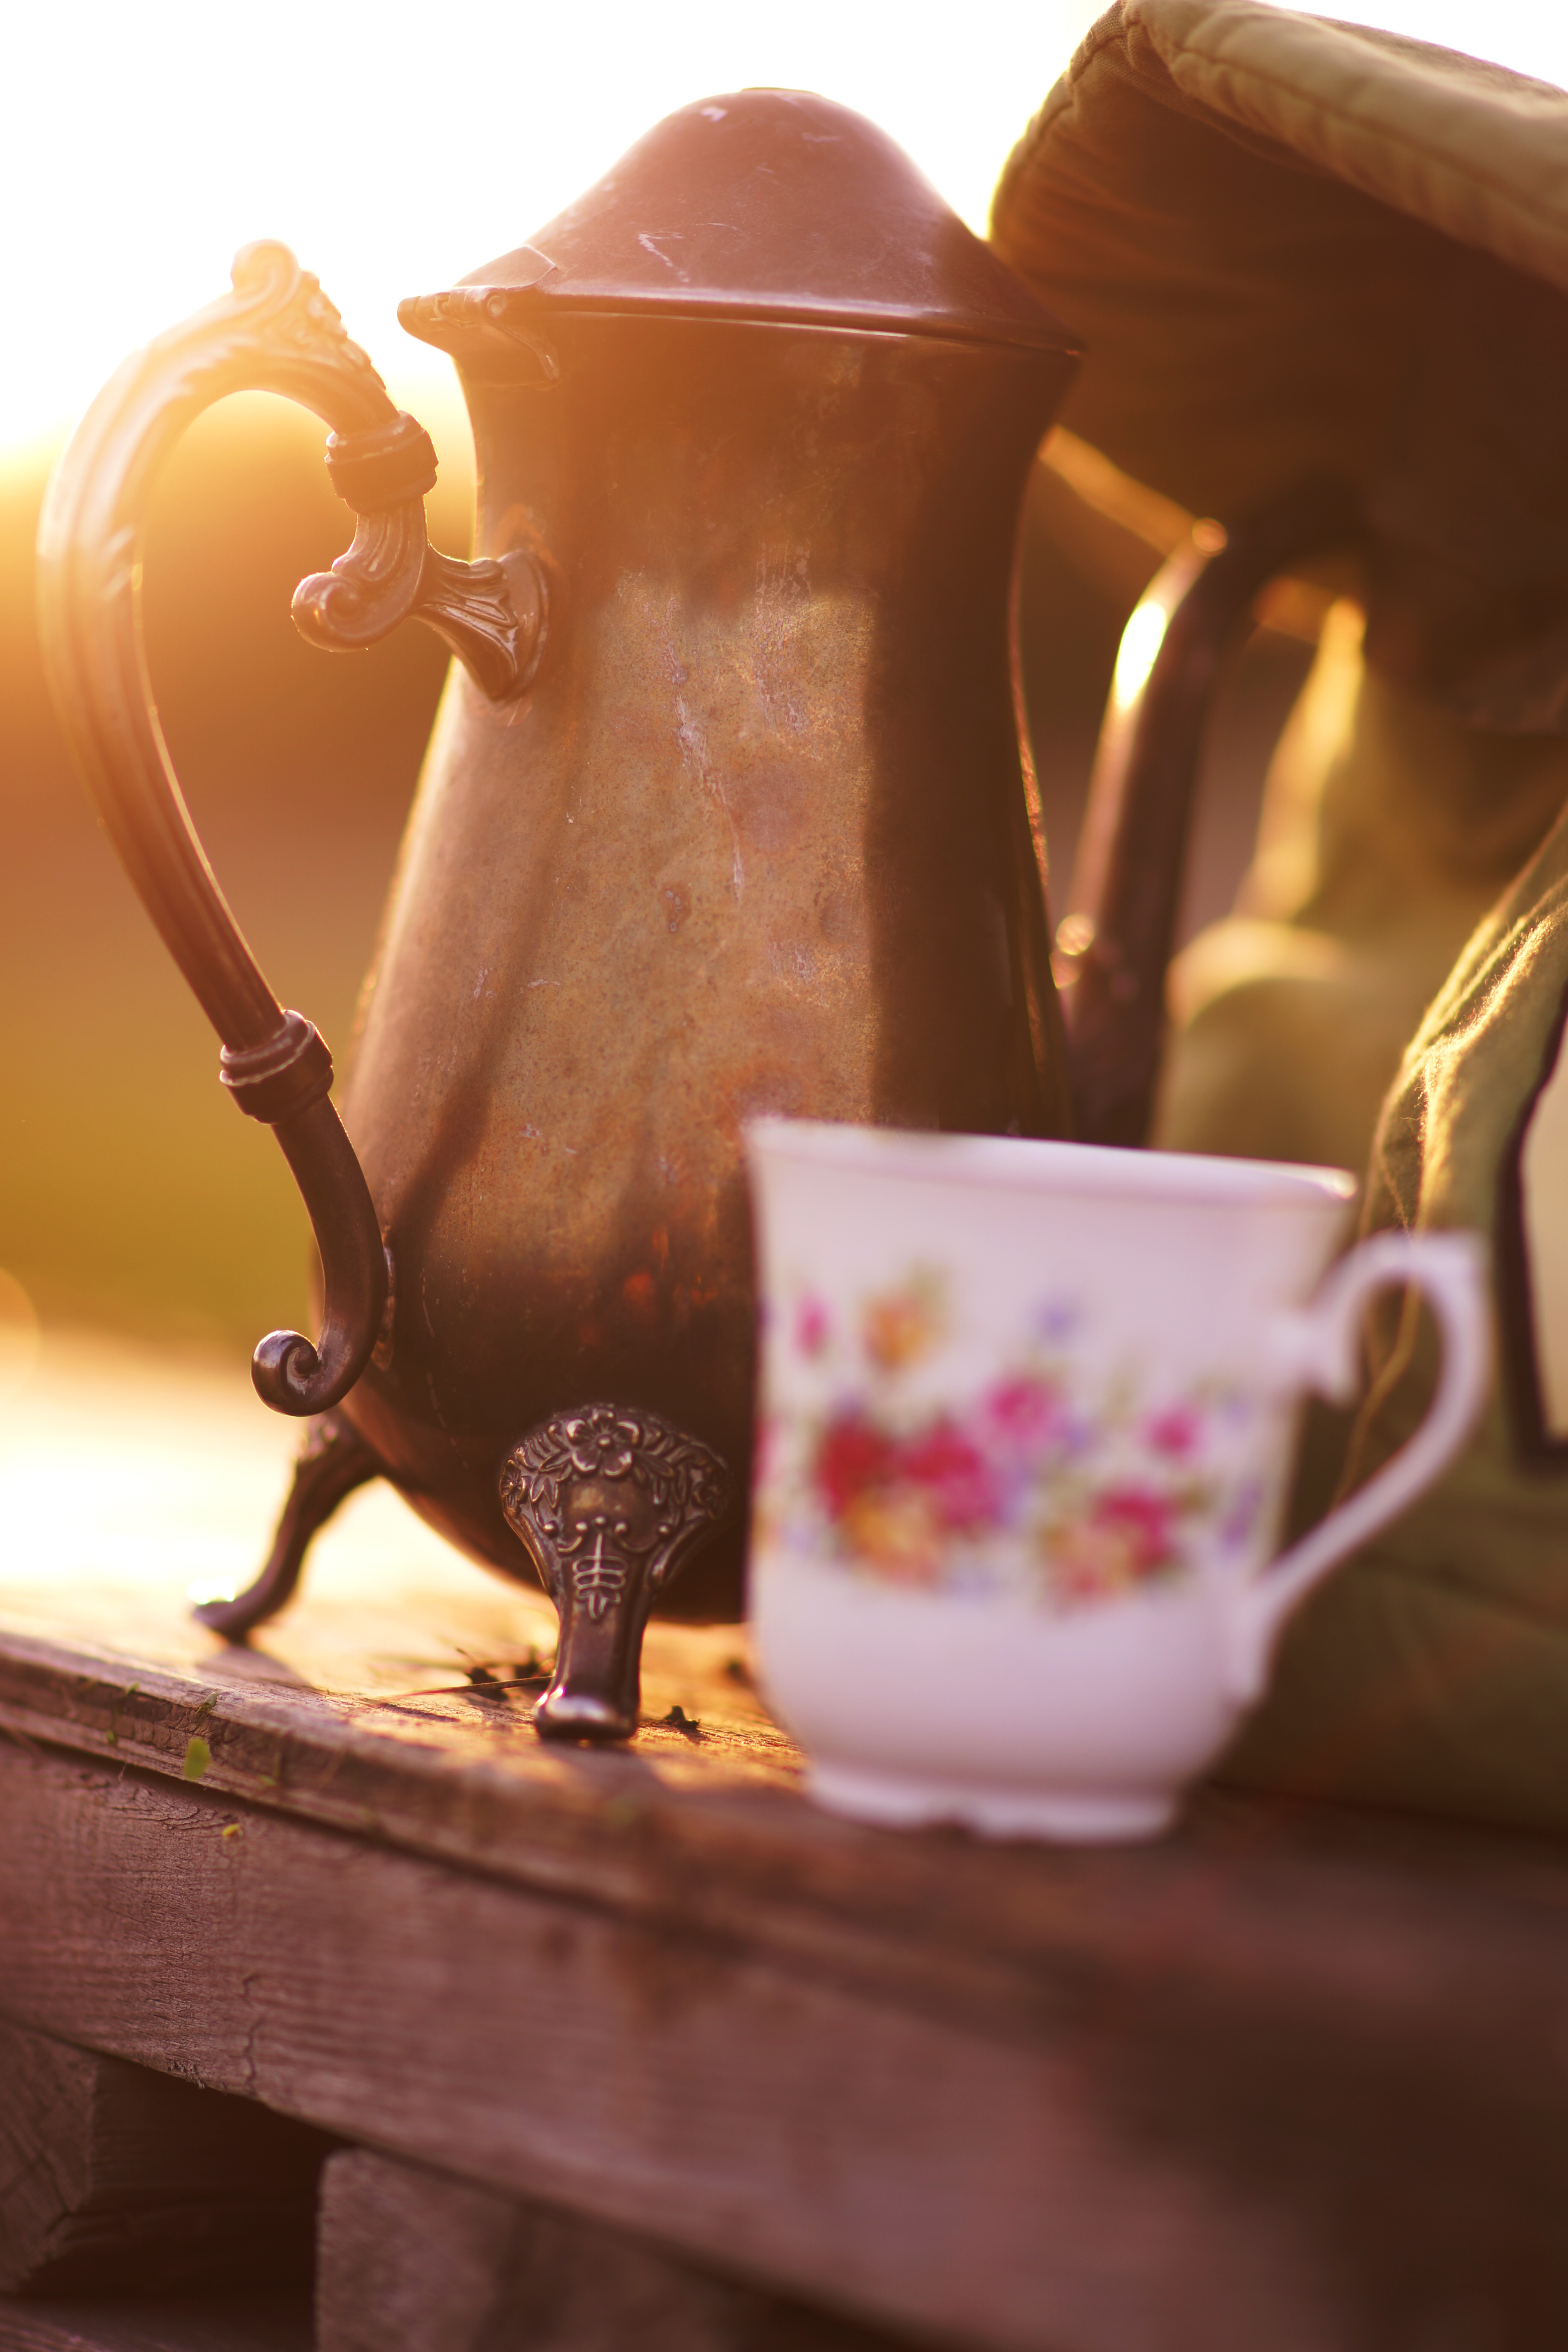
After I had my hand shot, I added the teacup. It was two shots together: one of me holding the handle and one by the bottom and then I merged them together. The same was true for the teapot, I just held it up in the air and then moved my hand so that I had a “clean” shot of the teapot.
All that was left was to get the “tea” pouring out the teapot. I do use actual tea, brought in a travel mug, for any photo that I’m pouring anything. I moved the books and hat and everything but the wooden thing out of the way and started pouring and instantly got soaked with tea as it all splashed back up from being poured on the wooden thing. The books, hat, my legs were all covered in a nice shower of Earl Grey tea….I dried everything off and then set off for home to edit.
Editing this photo didn’t take that long at all, the longest part was probably just manually stitching the photos together to get the expanded shot I mentioned before. I did also mirror the left side of the frame since on the right side of the hat was an ugly pile of dirt that was too big to clone out. I also used a photo of some cloud I had taken a few days ago to add some detail to sky. Once I had that as my starting point, I added my arm/hand. I added on a new layer and then using the layer mask tool, just ‘erased’ all of the part of my arm that would be “inside” the hat.
On a new layer I added the cup, rotating it a bit to give it some whimsy as it balanced on my finger. Again, using layer masking to get rid of anything I didn’t want.
Then I added the teapot and made it a bit larger than in real life. Using layer masking again to get rid any bits that I didn’t want.
Finally I added the tea, set it to “multiply” blending mode and positioned it pouring into the cup.

Here’s a wee animation to show the progress:
For the colour palatte, I wanted it to resemble the purples and pinks of Alice In Wonderland and thankfully Mother Nature helped a lot with that. Shooting in the breaths of sunset helps bring those tones out in the sky and the atmosphere and I also adjust the colour balance in camera to shoot a bit heavier on the red/purple tones.
In photoshop I used a combination of colour curves, colour balance, and selective colour adjustment layers to boost the pinks, yellows and purples that already existed in the photo. This is all up to personal preference and it part of the fun of photoshop, nobody’s colour palate and colour scheme is the same. I did create an action though that you’re welcome to use, it adds some contrast and “pink/purple” colour tones. I’ve used the action all the behind the scenes shots below so you can see what it adds to the image.
Action Link = http://we.tl/j1F24VKyXG
I hope that you enjoyed this short behind the scenes/tutorial post and let me know if you’d like to see more, maybe in video form!
Great Tutorial. Thanks For Sharing Joel 🙂
A really interesting and clearly explained tutorial on your shot. I love the finished result. I’m just starting to play around with using layers & masks to get more creative with my shots so this was very inspiring, Thank you!
Thanks for such a wonderful tutorial! I would love to see more, you are so talented and have inspired so much of my work!
Always wondered how that worked. Thanks a lot for sharing this Joe! Love all your works!
Such a wonderful Creative Genius, I’m never sure how I feel after seeing your photos, a mixture of wonder and jealousy, always younger which mixes in extreme gratitude! Thank you so much for your tutorials, so unselfish of you! Hope your travels are going well! Cheers from Australia
I think you are BRILLIANT !
Thank you for sharing this! People who don’t know much about photography sometimes don’t realize how much work goes into a photo. This shows just how much effort can go into one picture!
OMG you are awesome *o* thank you i loved your behind the scenes/tutorial 😀 please make more of it !!
You’re work is amazing! I’m just getting into photography and trying to teach myself. I hope one day I can produce an image half as good as yours! Inspiring!
THANK YOU SO MUCH JOEL! YOU ARE OFFICIALLY BECOME ONE OF MY ARTIST REFERENCE! AMAZING..not many artist want to show tutorials. :’) VERY HELPFUL FOR MY WORK.